Инсталацията с Raspberry Noobs е детска игра! Всичко, от което се нуждаете, е RaspberryZeroW и празна SD карта.
Стъпка 1: Инсталатор на Noobs
Изтеглете инсталатора на Noobs от https://www.raspberrypi.org/downloads/noobs/.
Стъпка 2: SD карта
Разопаковайте този zip архив на празната SD карта.
Готово! Сега можете да свържете RaspberryPiZero към телевизора. След това ще видите менюто за инсталиране.
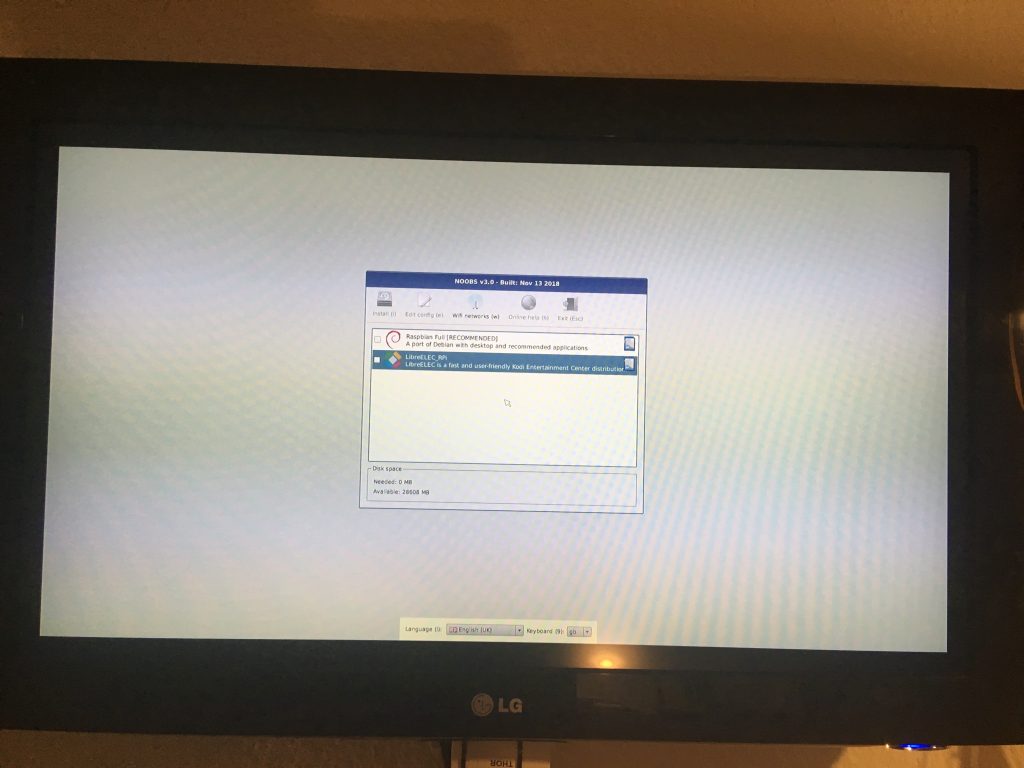
Ако имате NoobsLite на картата, първо трябва да установите WLAN връзка. След това изберете “Rasbian Lite” и щракнете върху “Install”. Rasbian Lite е сървърната версия без десктоп. След стартиране на системата управлението на пакетите трябва да се актуализира.
$ sudo apt-get update
$ sudo apt-get install -y nodm matchbox-window-manager uzbl xinit vim
$ sudo adduser dashboard
$ sudo su dashboard
$ sudo vim ~/.xsession
#!/bin/bash
xset s off
xset s noblank
xset -dpms
while true; do
  uzbl -u http://git-lab-ip/host/ -c /home/dashboard/uzbl.conf & exec matchbox-window-manager -use_titlebar no
done
След това натиснете клавиша “Esc”, за да промените режима на командата, и след това “:wq” за “write” и “quit”. Освен това този скрипт изисква следните права:
$ chmod 755 ~/.xsession
set config_home = /home/dashboard
set socket_dir=/tmp
set geometry=maximized
set show_status=0
set on_event = request ON_EVENT
@on_event LOAD_FINISH script @config_home/gitlab.js
Полувреме! Почти сте готови. Сега се нуждаете от Javascript, с който да симулирате поведението на потребителя. Важно е да създадете отделен потребител на Gitlab. Този потребител може да бъде управляван като “репортер” в проектите.
var gitlabUrl = 'http://git-lab-url:port';
var gitlabUser = 'userName';
var gitlabPassword = 'userPasswort';

/*--------------------------Timer--------------------------*/

var Timer = function(intervallInMsec)
{
  this.caller = new Array();
  this.intervall = window.setInterval(
    this.call.bind(this),
    intervallInMsec
  );
};

Timer.prototype.append = function(callFunction)
{
  this.caller.push(callFunction);
};

Timer.prototype.remove = function(callFunction)
{
  var index = this.caller.indexOf(callFunction);
  if (index > -1)
  {
    this.caller.splice(index, 1);
  }
};

Timer.prototype.call = function()
{
  for(
    var callerIndex = 0, callerLenght = this.caller.length;
    callerIndex < callerLenght;
    callerIndex++
  ) {
    this.caller[ callerIndex ].call();
  }
};

/* login verhalten */
var timer = new Timer(1000);
timer.append(
  function()
  {
    if (jQuery('#user_login').length > 0)
    {
      jQuery('#user_login').val(gitlabUser);
      jQuery('#user_password').val(gitlabPassword);
      jQuery('.btn-save').click();
    }
  }
);

/* wallboard aufrufen */
timer.append(
  function()
  {
    if (jQuery('.js-projects-list-holder').length > 0)
    {
      window.location.href = window.gitlabUrl + '/dashboard/issues?state=opened&utf8=✓&assignee_id=0';
    }
  }
);
/* reload verhalten */
timer.append(
  function()
  {
    if (jQuery('.issues-filters').length > 0)
    {
      window.location.href = window.gitlabUrl + '/dashboard/issues?state=opened&utf8=✓&assignee_id=0';
    }
  }
);
Сега можете да излезете от системата. Моля, променете настройката на DisplayManager в “/etc/default/nodm”. Тук трябва да промените “NODM_USER” на “dashboard” и “NODM_ENABLED” на “true”.
# nodm configuration

# Set NODM_ENABLED to something different than 'false' to enable nodm
NODM_ENABLED=true

# User to autologin for
NODM_USER=dashboard

# First vt to try when looking for free VTs
NODM_FIRST_VT=7

# X session
NODM_XSESSION=/etc/X11/Xsession

# Options for nodm itself
NODM_OPTIONS=

# Options for the X server.
#
# Format: [/usr/bin/<Xserver>] [:<disp>] <Xserver-options>
#
# The Xserver executable and the display name can be omitted, but should
# be placed in front, if nodm's defaults shall be overridden.
NODM_X_OPTIONS='-nolisten tcp'

# If an X session will run for less than this time in seconds, nodm will wait an
# increasing bit of time before restarting the session
NODM_MIN_SESSION_TIME=60

# Timeout (in seconds) to wait for X to be ready to accept connections. If X is
# not ready before this timeout, it is killed and restarted.
NODM_X_TIMEOUT=300
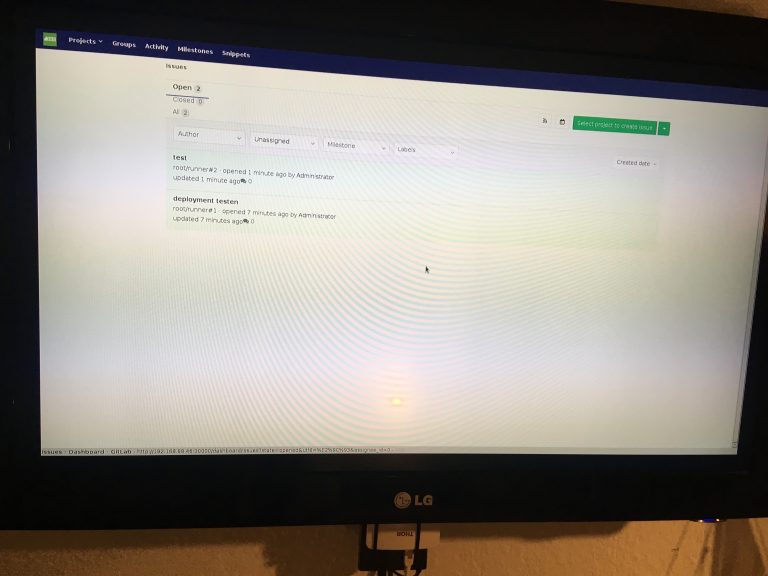
Ако сега рестартирате компютъра с командата “sudo reboot”, ще видите следното табло за управление: