L’installation avec Raspberry-Noobs est un jeu d’enfant ! Tout ce dont vous avez besoin est un RaspberryZeroW et une carte SD vierge.
Étape 1 : Installateur Noobs
Téléchargez l’installateur Noobs sur https://www.raspberrypi.org/downloads/noobs/.
Étape 2 : Carte SD
Décompressez cette archive zip sur la carte SD vide.

C’est terminé ! Vous pouvez maintenant connecter le RaspberryPiZero au téléviseur. Vous verrez ensuite le menu d’installation.

Si vous avez NoobsLite sur la carte, vous devez d’abord établir une connexion WLAN. Veuillez ensuite sélectionner “Rasbian Lite” et cliquer sur “Install”. Rasbian Lite est la variante serveur sans bureau. Après le démarrage, il faut mettre à jour le gestionnaire de paquets.
$ sudo apt-get update
$ sudo apt-get install -y nodm matchbox-window-manager uzbl xinit vim
$ sudo adduser dashboard
$ sudo su dashboard
$ sudo vim ~/.xsession
#!/bin/bash
xset s off
xset s noblank
xset -dpms
while true; do
  uzbl -u http://git-lab-ip/host/ -c /home/dashboard/uzbl.conf & exec matchbox-window-manager -use_titlebar no
done
Ensuite, appuyez sur la touche “Esc” pour changer le mode de commande, puis sur “:wq” pour “write” et “quit”. En outre, ce script nécessite les droits suivants :
$ chmod 755 ~/.xsession
set config_home = /home/dashboard
set socket_dir=/tmp
set geometry=maximized
set show_status=0
set on_event = request ON_EVENT
@on_event LOAD_FINISH script @config_home/gitlab.js
C’est la mi-temps ! Vous avez presque terminé. Vous avez maintenant besoin d’un Javascript avec lequel vous pouvez simuler le comportement d’un utilisateur. Il est important que vous créiez un utilisateur Gitlab séparé. Cet utilisateur peut être géré comme “reporter” dans les projets.
var gitlabUrl = 'http://git-lab-url:port';
var gitlabUser = 'userName';
var gitlabPassword = 'userPasswort';
/*--------------------------Timer--------------------------*/
var Timer = function(intervallInMsec)
{
this.caller = new Array();
this.intervall = window.setInterval(
this.call.bind(this),
intervallInMsec
);
};
Timer.prototype.append = function(callFunction)
{
this.caller.push(callFunction);
};
Timer.prototype.remove = function(callFunction)
{
var index = this.caller.indexOf(callFunction);
if (index > -1)
{
this.caller.splice(index, 1);
}
};
Timer.prototype.call = function()
{
for(
var callerIndex = 0, callerLenght = this.caller.length;
callerIndex < callerLenght;
callerIndex++
) {
this.caller[ callerIndex ].call();
}
};
/* login verhalten */
var timer = new Timer(1000);
timer.append(
function()
{
if (jQuery('#user_login').length > 0)
{
jQuery('#user_login').val(gitlabUser);
jQuery('#user_password').val(gitlabPassword);
jQuery('.btn-save').click();
}
}
);
/* wallboard aufrufen */
timer.append(
function()
{
if (jQuery('.js-projects-list-holder').length > 0)
{
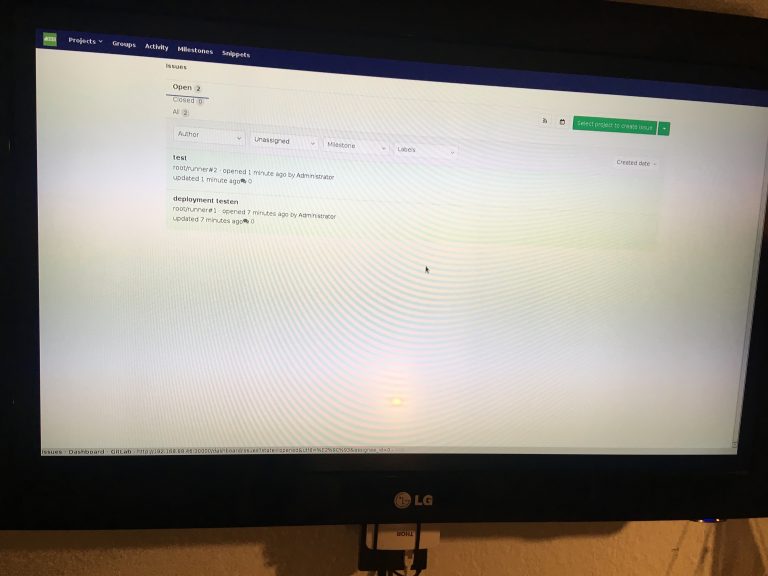
window.location.href = window.gitlabUrl + '/dashboard/issues?state=opened&utf8=✓&assignee_id=0';
}
}
);
/* reload verhalten */
timer.append(
function()
{
if (jQuery('.issues-filters').length > 0)
{
window.location.href = window.gitlabUrl + '/dashboard/issues?state=opened&utf8=✓&assignee_id=0';
}
}
);
Vous pouvez maintenant vous déconnecter. Veuillez modifier les paramètres de DisplayManager dans “/etc/default/nodm”. Ici, vous devez changer “NODM_USER” en “dashboard” et “NODM_ENABLED” en “true”.
# nodm configuration

# Set NODM_ENABLED to something different than 'false' to enable nodm
NODM_ENABLED=true

# User to autologin for
NODM_USER=dashboard

# First vt to try when looking for free VTs
NODM_FIRST_VT=7

# X session
NODM_XSESSION=/etc/X11/Xsession

# Options for nodm itself
NODM_OPTIONS=

# Options for the X server.
#
# Format: [/usr/bin/<Xserver>] [:<disp>] <Xserver-options>
#
# The Xserver executable and the display name can be omitted, but should
# be placed in front, if nodm's defaults shall be overridden.
NODM_X_OPTIONS='-nolisten tcp'

# If an X session will run for less than this time in seconds, nodm will wait an
# increasing bit of time before restarting the session
NODM_MIN_SESSION_TIME=60

# Timeout (in seconds) to wait for X to be ready to accept connections. If X is
# not ready before this timeout, it is killed and restarted.
NODM_X_TIMEOUT=300
Si vous redémarrez maintenant avec “sudo reboot”, vous verrez le tableau de bord suivant :