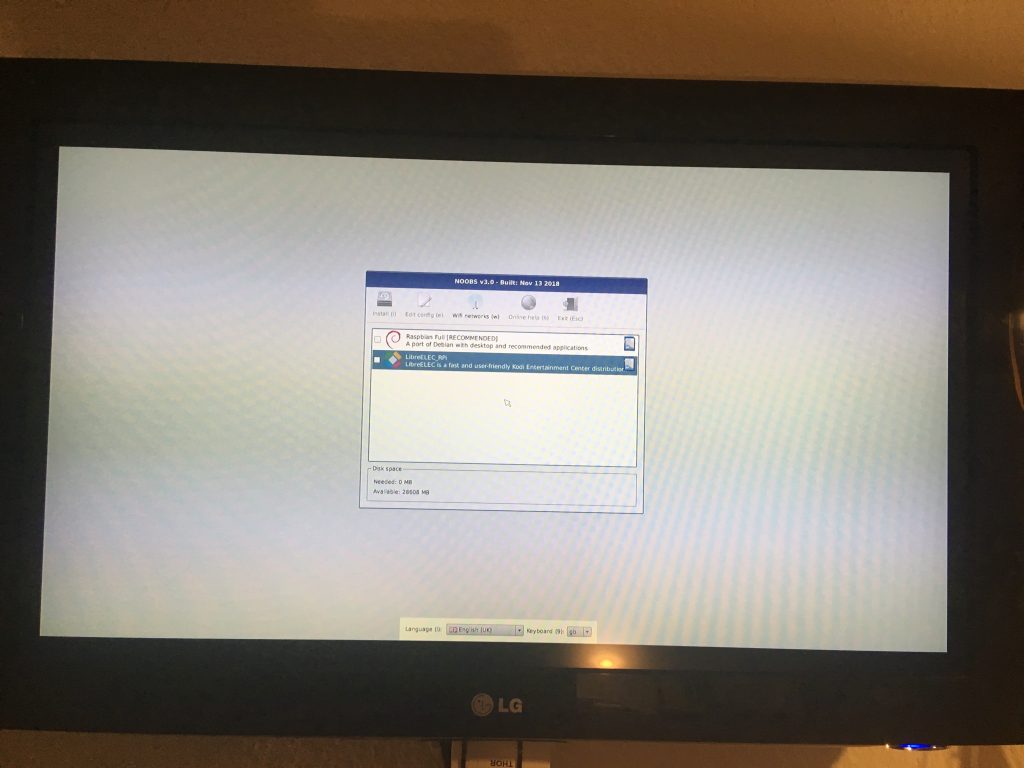
Instalasi dengan Raspberry Noobs adalah permainan anak-anak! Yang Anda butuhkan hanyalah RaspberryZeroW dan kartu SD kosong.
Langkah 1: Penginstal Noobs
Unduh penginstal Noobs dari https://www.raspberrypi.org/downloads/noobs/.
Langkah 2: Kartu SD
Buka kemasan arsip zip ini pada kartu SD yang kosong.
Selesai! Sekarang anda bisa menghubungkan RaspberryPiZero ke TV. Anda kemudian akan melihat menu instalasi.
Jika Anda memiliki NoobsLite pada kartu, Anda harus terlebih dulu membuat koneksi WLAN. Kemudian pilih “Rasbian Lite” dan klik “Install”. Rasbian Lite adalah versi server tanpa desktop. Setelah booting, manajemen paket harus diperbarui.
$ sudo apt-get update
$ sudo apt-get install -y nodm matchbox-window-manager uzbl xinit vim
$ sudo adduser dashboard
$ sudo su dashboard
$ sudo vim ~/.xsession
#!/bin/bash
xset s off
xset s noblank
xset -dpms
while true; do
  uzbl -u http://git-lab-ip/host/ -c /home/dashboard/uzbl.conf & exec matchbox-window-manager -use_titlebar no
done
Kemudian tekan tombol “Esc” untuk mengubah mode perintah dan kemudian “:wq” untuk “write” dan “quit”. Selain itu, skrip ini memerlukan hak-hak berikut ini:
$ chmod 755 ~/.xsession
set config_home = /home/dashboard
set socket_dir=/tmp
set geometry=maximized
set show_status=0
set on_event = request ON_EVENT
@on_event LOAD_FINISH script @config_home/gitlab.js
Paruh waktu! Anda hampir selesai. Sekarang Anda memerlukan Javascript yang dapat digunakan untuk mensimulasikan perilaku pengguna. Penting bagi Anda untuk membuat pengguna Gitlab yang terpisah. Pengguna ini bisa dikelola sebagai “reporter” dalam proyek.
var gitlabUrl = 'http://git-lab-url:port';
var gitlabUser = 'userName';
var gitlabPassword = 'userPasswort';

/*--------------------------Timer--------------------------*/

var Timer = function(intervallInMsec)
{
  this.caller = new Array();
  this.intervall = window.setInterval(
    this.call.bind(this),
    intervallInMsec
  );
};

Timer.prototype.append = function(callFunction)
{
  this.caller.push(callFunction);
};

Timer.prototype.remove = function(callFunction)
{
  var index = this.caller.indexOf(callFunction);
  if (index > -1)
  {
    this.caller.splice(index, 1);
  }
};

Timer.prototype.call = function()
{
  for(
    var callerIndex = 0, callerLenght = this.caller.length;
    callerIndex < callerLenght;
    callerIndex++
  ) {
    this.caller[ callerIndex ].call();
  }
};

/* login verhalten */
var timer = new Timer(1000);
timer.append(
  function()
  {
    if (jQuery('#user_login').length > 0)
    {
      jQuery('#user_login').val(gitlabUser);
      jQuery('#user_password').val(gitlabPassword);
      jQuery('.btn-save').click();
    }
  }
);

/* wallboard aufrufen */
timer.append(
  function()
  {
    if (jQuery('.js-projects-list-holder').length > 0)
    {
      window.location.href = window.gitlabUrl + '/dashboard/issues?state=opened&utf8=✓&assignee_id=0';
    }
  }
);
/* reload verhalten */
timer.append(
  function()
  {
    if (jQuery('.issues-filters').length > 0)
    {
      window.location.href = window.gitlabUrl + '/dashboard/issues?state=opened&utf8=✓&assignee_id=0';
    }
  }
);
Sekarang Anda bisa log keluar. Harap ubah pengaturan DisplayManager di bawah “/etc/default/nodm”. Di sini Anda harus mengubah “NODM_USER” menjadi “dashboard” dan “NODM_ENABLED” menjadi “true”.
# nodm configuration

# Set NODM_ENABLED to something different than 'false' to enable nodm
NODM_ENABLED=true

# User to autologin for
NODM_USER=dashboard

# First vt to try when looking for free VTs
NODM_FIRST_VT=7

# X session
NODM_XSESSION=/etc/X11/Xsession

# Options for nodm itself
NODM_OPTIONS=

# Options for the X server.
#
# Format: [/usr/bin/<Xserver>] [:<disp>] <Xserver-options>
#
# The Xserver executable and the display name can be omitted, but should
# be placed in front, if nodm's defaults shall be overridden.
NODM_X_OPTIONS='-nolisten tcp'

# If an X session will run for less than this time in seconds, nodm will wait an
# increasing bit of time before restarting the session
NODM_MIN_SESSION_TIME=60

# Timeout (in seconds) to wait for X to be ready to accept connections. If X is
# not ready before this timeout, it is killed and restarted.
NODM_X_TIMEOUT=300
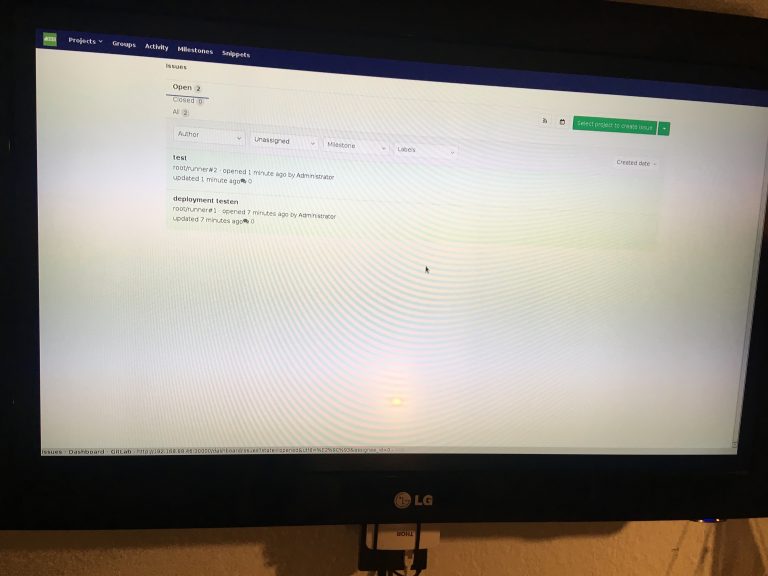
Jika Anda sekarang melakukan reboot dengan “sudo reboot”, Anda akan melihat dasbor berikut ini: