Raspberry Noobs ile kurulum çocuk oyuncağı! İhtiyacınız olan tek şey bir RaspberryZeroW ve boş bir SD kart.
Adım 1: Noobs Yükleyici
Noobs yükleyicisini https://www.raspberrypi.org/downloads/noobs/ adresinden indirin.
Adım 2: SD kart
Bu zip arşivini boş SD karta açın.
Tamamdır! Şimdi RaspberryPiZero’yu TV’ye bağlayabilirsiniz. Daha sonra kurulum menüsünü göreceksiniz.
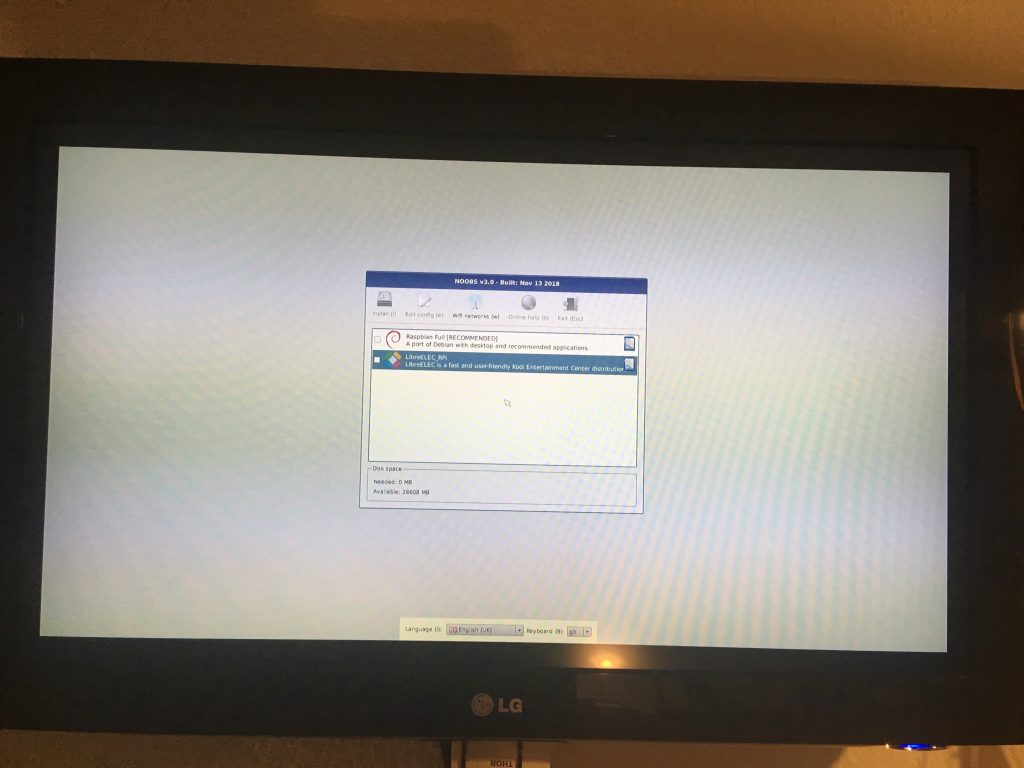
Kartta NoobsLite varsa, önce bir WLAN bağlantısı kurmanız gerekir. Ardından “Rasbian Lite “ı seçin ve “Yükle “ye tıklayın. Rasbian Lite, masaüstü olmayan sunucu sürümüdür. Önyüklemeden sonra paket yönetimi güncellenmelidir.
$ sudo apt-get update
$ sudo apt-get install -y nodm matchbox-window-manager uzbl xinit vim
$ sudo adduser dashboard
$ sudo su dashboard
$ sudo vim ~/.xsession
#!/bin/bash
xset s off
xset s noblank
xset -dpms
while true; do
  uzbl -u http://git-lab-ip/host/ -c /home/dashboard/uzbl.conf & exec matchbox-window-manager -use_titlebar no
done
Ardından komut modunu değiştirmek için “Esc” tuşuna ve ardından “write” ve “quit” için “:wq” tuşuna basın. Ayrıca, bu komut dosyası aşağıdaki hakları gerektirir:
$ chmod 755 ~/.xsession
set config_home = /home/dashboard
set socket_dir=/tmp
set geometry=maximized
set show_status=0
set on_event = request ON_EVENT
@on_event LOAD_FINISH script @config_home/gitlab.js
Devre arası! Neredeyse bitti. Şimdi kullanıcı davranışını simüle edebileceğiniz bir Javascript’e ihtiyacınız var. Ayrı bir Gitlab kullanıcısı oluşturmanız önemlidir. Bu kullanıcı projelerde “raportör” olarak yönetilebilir.
var gitlabUrl = 'http://git-lab-url:port';
var gitlabUser = 'userName';
var gitlabPassword = 'userPasswort';

/*--------------------------Timer--------------------------*/

var Timer = function(intervallInMsec)
{
  this.caller = new Array();
  this.intervall = window.setInterval(
    this.call.bind(this),
    intervallInMsec
  );
};

Timer.prototype.append = function(callFunction)
{
  this.caller.push(callFunction);
};

Timer.prototype.remove = function(callFunction)
{
  var index = this.caller.indexOf(callFunction);
  if (index > -1)
  {
    this.caller.splice(index, 1);
  }
};

Timer.prototype.call = function()
{
  for(
    var callerIndex = 0, callerLenght = this.caller.length;
    callerIndex < callerLenght;
    callerIndex++
  ) {
    this.caller[ callerIndex ].call();
  }
};

/* login verhalten */
var timer = new Timer(1000);
timer.append(
  function()
  {
    if (jQuery('#user_login').length > 0)
    {
      jQuery('#user_login').val(gitlabUser);
      jQuery('#user_password').val(gitlabPassword);
      jQuery('.btn-save').click();
    }
  }
);

/* wallboard aufrufen */
timer.append(
  function()
  {
    if (jQuery('.js-projects-list-holder').length > 0)
    {
      window.location.href = window.gitlabUrl + '/dashboard/issues?state=opened&utf8=✓&assignee_id=0';
    }
  }
);
/* reload verhalten */
timer.append(
  function()
  {
    if (jQuery('.issues-filters').length > 0)
    {
      window.location.href = window.gitlabUrl + '/dashboard/issues?state=opened&utf8=✓&assignee_id=0';
    }
  }
);
Şimdi oturumu kapatabilirsiniz. Lütfen “/etc/default/nodm” altındaki DisplayManager ayarını değiştirin. Burada “NODM_USER” değerini “dashboard” ve “NODM_ENABLED” değerini “true” olarak değiştirmelisiniz.
# nodm configuration

# Set NODM_ENABLED to something different than 'false' to enable nodm
NODM_ENABLED=true

# User to autologin for
NODM_USER=dashboard

# First vt to try when looking for free VTs
NODM_FIRST_VT=7

# X session
NODM_XSESSION=/etc/X11/Xsession

# Options for nodm itself
NODM_OPTIONS=

# Options for the X server.
#
# Format: [/usr/bin/<Xserver>] [:<disp>] <Xserver-options>
#
# The Xserver executable and the display name can be omitted, but should
# be placed in front, if nodm's defaults shall be overridden.
NODM_X_OPTIONS='-nolisten tcp'

# If an X session will run for less than this time in seconds, nodm will wait an
# increasing bit of time before restarting the session
NODM_MIN_SESSION_TIME=60

# Timeout (in seconds) to wait for X to be ready to accept connections. If X is
# not ready before this timeout, it is killed and restarted.
NODM_X_TIMEOUT=300
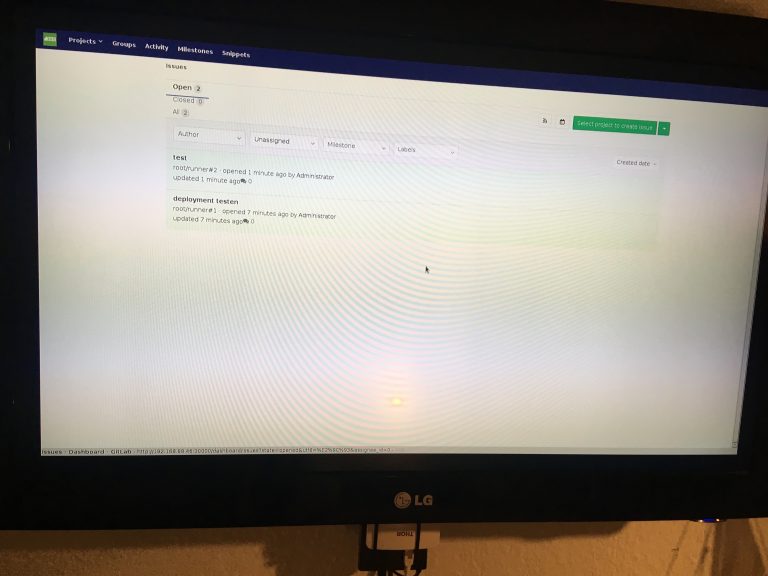
Şimdi “sudo reboot” ile yeniden başlatırsanız, aşağıdaki gösterge tablosunu göreceksiniz: